Showing posts with label art. Show all posts

Saturday, September 1, 2012

Rainy Day Bubble Paintings!


     What better way to spend a rainy day but in the throes of carefree creativity?  While I was napping away in the next room, my husband and daughter were creating a lovely collection of bubble paintings! 

     To create these beautiful masterpieces, all you need is some paint (acrylic works well), bubble solution, bubble blowers, and lots of paper.  Simply mix a dab of paint in with your bubble solution, stir, and you are ready to go!  I do however, recommend wearing a smock.  Painted bubbles can land anywhere.  Although, these pretty bubble pictures were made inside, outside is really the best place to create your masterpieces.  

     Sometimes, we make our bubble pictures on good quality paper, and cut them into note cards or gift tags.  They are always a big hit!  


Give it a try! 

Each piece is a very unique piece of work.  No two are ever the same!

Tuesday, April 3, 2012

The Cutest Easter Eggs Ever!!


My daughter and I found these super cute printables to make excellent Easter eggs!!

Check out Mr. Printables website. Great stuff!!


Friday, January 27, 2012

Crazy, Sticky Condensed Milk Painting

So lately, I have become pretty addicted to Pinterest. I love that I can find loads of great ideas all in one place. Recently, I ran across this very creative idea for homemade paint. The recipe is quite simple - sweetened condensed milk and food coloring. I quickly picked up the ingredients from the grocery store and the experiment began. Now, I have a daughter who is up for anything creatively, so I knew this would be right up her alley.

Upon opening the condensed milk, I became somewhat skeptical. The milk was beige in color and extremely sticky. I wondered if I would be able to make pretty colors with this sticky, mess. I scooped out a bit of the condensed milk into a small bowl, added a bit of food coloring, and WOW! the color was bright and ready to go. We immediately mixed a variety of colors and prepared to create!

Painting with the milk paint proved to be a great time. My daughter & I loved the way the thick, sticky paint felt dragging across the paper. The colors were vibrant and very glossy.

I highly recommend giving this unusual paint recipe a try. It was a fun experiment that created some beautiful pictures! The only downside? The pictures are quite sticky and take a few days to dry.

Check out these fab Condensed Milk Paintings! I love the way they shine. Thanks for the great idea Pinterest!

Friday, April 8, 2011

A Touch of Impressionism


Recently, Youth Art Month, which is in March, inspired me to add art history to our homeschool daily schedule. Our most recent lesson was on Impressionism. Impressionism is one of my favorite art styles to teach to kids. The bright colors and blurry images that are attributed to this style are easy and fun for kids to create. Gone is the stress of getting all the details of a face perfect. Fuzzy, unfocused images are perfect for Impressionist style paintings!

Impressionism is a style that began in France in the 19th century. It is a style in which the artist captures the image of an object as someone would see it if they just caught a glimpse of it. They paint the pictures with a lot of color and most of their pictures are outdoor scenes. Their pictures are very bright and vibrant. The artists like to capture their images without detail but with bold colors.

For my lesson, I chose to focus on the art of Monet. We looked at many of his images including the painting Jardin a Giverny.

Monet's - Jardin a Giverny

This particular Impressionism project for kids is a collage and painting combo. I found the idea at Edhelper.com. Edhelper is a subscription site, but as a homeschooling mom, I find myself using this site almost daily. If you are a subscriber, you can find the lesson under Major Art Movements (Art Styles) - Impressionism.

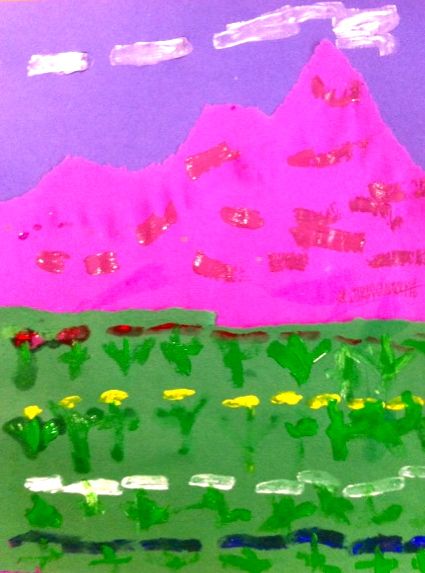
This lesson begins with 9" x 12" pieces of blue, purple, and green construction paper. Tear the top off the purple sheet in a jagged way as to look like the bumpy edge of mountains. Glue the purple sheet on top of the blue sheet, lining up the bottom straight edges. Next, tear the green sheet in half to create the edge of the ground. Glue the green sheet onto the purple, lining it up to the straight bottom edge.

Prepare a paint palatte (I use styrofoam plates) for the student with the primary colors (red, yellow, and blue) and white. Secondary colors (purple, orange, and green) can be mixed from their primary colors. White can be added to make tints, or lighter versions of their colors.

Once the colors have been prepared, the kids can paint clouds in the sky, ridges along the montains, flowers, and grass. Remind them that the details are fuzzy and unfocused, but bold and bright.


The results are colorful and fun Impressionism inspired mixed-media creations!

My kids enjoyed this project. Even my son, who is typically a non-painter, participated in this one.

Spring is a terrific time to give Impressionism a try. The nice weather provides a great opportunity to create art "en plein air" or "in the open air" as many of the Impressionists did so frequently. Grab your art supplies and head outdoors! That would be creating art in true Impressionistic style!


Tuesday, September 7, 2010

Turn Yourself Into a Comic Icon!


Check out my husband's latest portrait style. Taaaa Daaaa................. It's "COMIC STYLE" !

This portrait style is perfect for all social media needs! Facebook pics, twitter, blog profile pics- anytime you want to give yourself a little pizazz!

The portraits can be ordered for $25.00 from his website - www.cpbstudios.com
What do ya think?


Friday, August 6, 2010

Georgia O'Keefe Creations

Student Work

Georgia O'Keeffe (1887-1986) was an American abstract painter born in Wisconsin. She attended the Art Institute of Chicago, the Art Student's League in New York, and Colombia Teacher's College in New York. She was an art teacher before she became a full time artist. She was a leader in the development of the American Modernism Movement. O'Keeffe painted still lifes, massive flowers, the New York at Night series, southwestern landscapes and stark bones found in the desert. In 1939, she was selected as one of the twelve most outstanding women of the past fifty years by the New York World's Fair Committee. Her painting, Sunset-Long Island, was chosen to represent New York in an exhibition of the art of the United States at the World's Fair. In 1985, O'Keeffe was granted the Medal of Arts by President Ronald Reagan.

Red Poppy by Georgia O'Keefe


Pelvis With Distance by Georgia O'Keefe


In this lesson, students will be painting flowers or skulls in the style of O'Keefe. This can be accomplished quite easily by following these simple steps.

1. Find a picture of a flower or skull that you would like to paint. I usually find my samples on the internet.

2. Draw the flower or skull on your paper with a pencil. Draw it so large that it runs off the page. There should not be any empty background. The flower or skull should take up all of the paper.

3. Using paint, color the picture. Quite often, O'Keefe's paintings have either a warm or a cool feel. This can be accomplished by either using all warm colors (red, orange, and yellow), or all cool colors (blue, purple, and green.)

This picture below is being painted with cool colors.


This student has printed out pictures of flowers to use as a reference.


Here are some of our finished pictures! One warm and one cool - can you figure out which is which?


Good Luck with your O'Keefe creations! I know they will be beautiful - with such pretty subject matter and vivid colors they always are!


Saturday, May 8, 2010

Self-Guided Art Projects

Every now and then, my daughter secretly digs through my art cabinet and drags out a bunch of random supplies. I usually find her on the floor or at the table creating her own masterpiece, free from direction or expectations. These are the art projects she loves the most. They are totally her own, from the selection of the supplies to the execution of the composition. Quite often, she will sit for a long time playing with her creation. They are often cities, or houses, or as the case this time, a baby's nursery.

My daughter's self-guided art moments remind me to let go sometimes and let her be in control of her own creations, from start to finish - no directions and no expectations.

Give it a try sometime - set out a variety of arts & crafts supplies for your child and then just let them be. See what they come up with. I guarantee it will be a creative masterpiece!


Wednesday, April 28, 2010

Fantastic Friday with the Arts - Tissue Paper Forsythia

While perusing my favorite blogs recently, I came across a must do art activity. Pink and Green Mama posted a fantastic art project using paint and tissue paper to recreate the flowering plant, Forsythia. I love to see Forsythia in the spring, and the thought of a classroom full of painted Forsythia sounded exciting! I decided to have my small art class give this project a try. We followed the directions listed on Pink and Green Mama's blog. Here is a link to the activity on her blog - Pink and Green Mama: Easy Kid Spring Art Craft: Tissue Paper Forsythia

1. The kids used a straw to blow very watered down tempera paint into the shape of Forsythia branches.

2. Next, they painted small green leaves around the branches.

3. Then the kids glued on crinkled pieces of yellow tissue paper to represent the Forsythia blooms.


4. Voila!! The finished Forsythia plants! Hang these in your home and it can look like springtime all year round!


Thanks Pink and Green Mama for the wonderful and fun Forsythia activity!!


Friday, April 23, 2010

Fantastic Friday with the Arts - Joan Miro

Joan Miro was a Spanish artist who developed a very whimsical style back in the 1930’s. His painting called “People and Dog in Sun” is a fun one to imitate by drawing stick figures and stars.

1. Give each student a 9" x 12" piece of watercolor paper and pencil. They are to draw one large stick figure in the middle, preferably in some action pose. Miro often repeated shapes in his work so ask the students to add more shapes to their art but ONLY by using lines and dots. At least two of the shapes need to intersect (overlap) to make more shapes to color.

2. After the pencil drawing is done, the students need to trace it heavily with a black crayon.

3. Have the students fill in all the shapes they have made with a different color.

Have a super time creating your own Miro's! Check back next week for a new lesson based on a different artist. See you then!


Wednesday, April 7, 2010

Spunky Jack Russell


My husband just completed this digital portrait of our energetic puppy in a rare inquisitive moment. She is usually burning a trail in the backyard.

This image is painstakingly drawn/painted digitally with no photo manipulation.
It is essential to him that the process mimic traditional drawing and painting techniques.
He is currently using a Intuos 3 Wacom tablet with Corel Painter X.

Portraits make great gifts for friends and family - know anyone with a birthday coming up? Check out my husband's website - we have a quick and easy way to order that special portrait.

Thursday, March 11, 2010

My Sweet Girl

Meet my sweet daughter - she is 7 yrs. old now, but this adorable portrait takes me back to her first ballet recital when she was only 3. My husband is a portrait artist - this is his latest creation. We have recently started an online portrait business. If you happen to be looking for a gift for that hard to buy for person, consider a portrait. We have any easy to use website that allows you to quickly order the perfect portrait for you or someone you know. Take a look!
Our business can be found at - www.cpbstudios.com

Sunday, February 28, 2010

Ants on a Log!


This past Saturday was the Pinewood Derby for our cub scout pack. Being artsy people, my husband and I always shoot for the design award. This year's car was fashioned after the yummy and healthy snack ants on a log! The little raisons looked so cute steering their peanut butter filled celery stalk to the finish line. We didn't win any awards for speed, but we did take home the trophy for best design! Yeah!

Friday, February 12, 2010

Fantastic Friday with the Olympics!!


He everyone! For the next few Fridays, I am going to be planning most of my activities around the Olympics. The Olympics provide an excellent opportunity to teach about the geography and culture of the many countries involved in the games. We started our Olympics unit by learning about the history of the games (Greece) and about the hosting country of Canada. I found a lot of really good information about the origins of the Olympics at Olympics - EnchantedLearning.com. Enchanted Learning is a pay site (not too much), but I have found it to be well worth the money. After learning about the background of the games, the kids colored their own Olympic flags. We put them on sticks so we could wave them around a bit.


Next, we pulled out our atlas and found Canada (Vancouver) on our map. Then we made our own Canadian flags. I found a good maple leaf template at http://www.activityvillage.co.uk/Maple%20leaf%20template.PDF. We of course had to listen to the Canadian national anthem while we made them. I found lots of good versions on YouTube.


Here the kids are making their own maple leaf paper quilt squares. I found a great paper template for it at Maple Leaf Quilt Block Coloring Page - EnchantedLearning.com. I printed one out and colored it as a guide for them. I also pre-cut one blue 6" x 6" square, and nine 2" x 2" red squares for each child. The kids arranged them in the maple leaf pattern, cutting them diagonally in half when needed.


Here are our finished maple leaf quilt squares. This activity really worked the kids' observational skills. They had to make sure all the pieces were in the right places, turned the right way.

Next week we'll start learning about some of the countries participating in the games. Check back for more activities!
Go USA!!!

Wednesday, February 10, 2010

How We Spent Our Snowy Day

Well, It was a very snowy day in Eastern Kentucky and it seemed like the perfect opportunity to try out our new microscope - on snowflakes of course! We sprayed some microscope slides with lacquer and set them outside to catch some flakes. Once we were sure we had some, we brought them in and gave the lacquer time to dry. The snowflakes melted, but the lacquer was imprinted with the shape of the snowflakes! Too cool! Here are the kids checking out the flakes. The kids drew pictures of the magnified snowflakes in their nature journal. Thanks Papa for the new microscope!!!

After our snowy science lesson, Abbey moved on to a recycled materials art project. When we received our fabulous new microscope in the mail, it came packed in lots and lots of packing peanuts. Abbey created a terrific picture for her daddy by gluing them down to construction paper and coloring them with paint pens.


The final product!


Last, but not least, we brought some snow inside for the little dollies to play in. It was really too cold to play outside today, so we brought a bit of the fun indoors! Abbey loved this - I refilled her snow many, many times.


Anybody have any new snow day ideas for me? I am always looking for fun ideas. Let me hear your thoughts. Apparently, the weatherman says we may get more snow, so I am gonna need them!

Thanks for reading!!


Tuesday, February 9, 2010

Art in the Family


Doesn't this baby look like it should be in a Gerber commercial?
This is a portrait of my niece, Macey.
My husband is a portrait painter (we met in art school), and I think this portrait is one of my favorites.
Meet Garcia - a family dog. He passed a few years ago, but this special portrait reminds us of his happy personality.

Check out some more of his work at www.cpbstudios.com

Friday, February 5, 2010

Fantastic Friday with the Arts - Rockwell/Big Band


Welcome everyone!

On this fantastic Friday, we are studying the American Artist and Illustrator Norman Rockwell (February 3, 1894 – November 8, 1978). We began this lesson by learning a bit about his life. I found a wonderful bio sheet on him at teachervision. It is a pay site, but they will let you print out a few for free. Here is the link - Norman Rockwell Printable (5th - 8th Grade) - TeacherVision.com

Next, we looked at a Norman Rockwell book from the library. My kids loved his work. They could really identify with the everyday situations in his paintings. I also found a great packet of activities online at The Norman Rockwell Museum. The packet can be downloaded as a pdf and printed from this link -http://www.nrm.org/pdfs/family-guide.pdf. It was just full of fun activities that helped the kids really explore the paintings. The last page of the packet is a blank Saturday Evening Post cover template. As Rockwell was most known for his covers of this popular magazine, I thought it only proper that we try our own Saturday Evening Post covers. We discussed the fact that Rockwell was an illustrator portraying endearing scenes of everyday life. That they are in fact a good example of narrative art - artwork created to tell a story. I then set the kids off on their mission - to create their own magazine cover telling a story about their own life. My son's picture is all about his dog - his best friend.


My daughter decided to draw about her favorite time of day - reading in bed at bedtime with her daddy.


Here is Abbey's finished masterpiece - ready for publication!


Our music connection this week is big band/swing music. It was a popular style of music during Rockwell's time. I found a bio sheet for him at teachervision as well. Here it is - Swing Was the Thing Printable (5th - 8th Grade) - TeacherVision.com. We talked a bit about Benny Goodman and listened to his big band music while working on our magazine covers. I found great videos of his music on youtube.

Well guys - that 's it for this week! Have fun creating!